Showing posts with label Cano. Show all posts

Monday, November 14, 2011

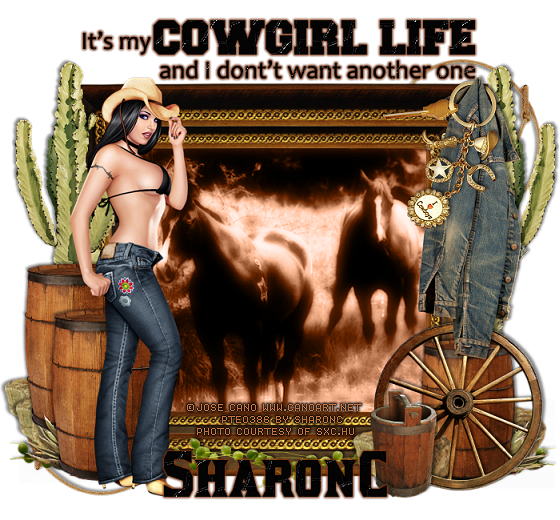
Cowgirl's Life FTU


This tut was written for those with a basic knowledge of psp.
I am using the awesome artwork of Jose Cano. You need a license to use this art work. Please do not use without a license.
He use to sell at PTE when I bought my tube, which has closed now.
You can find his art at his store  HERE

Scrap kit used is by Mediterranka Design called Cowgirl's Life,  and you can get it at her blog HERE
Font I used was Kirsty and you can get it HERE

Supplies Needed

I used PSPX...but any of them should work.
Drop Shadow V2 H2 50 5
Filters used
xero filters-Radiance, porcelain and mistifier
xenofex 1.0 Baked Earth-Optional
EyeCandy 4000-Gradient Glow

Drop shadow is usually 2V 2H 50 5 Depending on where you want your shadow sometimes you might have to do the minus on them.

Ok Let's get started
Open a 700 x 700 image, can alway resize later. 
Open the frame with the gold and resize it to 30%, copy and paste, then  go back and undo resize on original frame, now resize to 35% and paste on top of the other frame,  merge down. Take your magic wand click inside, go to selections, expand and expand by 2, add a new raster layer and fill with a color of choice, I used #86441f, move below your frame,  copy and paste your image of choice, I used one from sxc.hu, then invert and delete, select none.
Duplicate your image now, on the original add xero radiance and porcelain and change the blend mode to luminance (L). Go to the top image and change the blend mode to overlay. Apply xero porcelain to that one twice, then merge down and apply mistifier. All at default settings. Resize the branch to 25% place on frame and duplicate mirror and adjust...merge the 2 branches, add your drop shadow.
Resize the barrel to 15% place to the left on frame duplicate and adjust to your liking. Duplicate again to 85% and move to the right, resize the water bucket to 15% and place to the left of the barrel a bit...refer to my tag for placement....Resize the denim jacket to 25% and put it in the right hand corner like it is hanging on the frame. Resize the wheel to 15% place above the barrel but below the water bucket...resize the keyring and hang above the jacket but erase some of the loop to make it look like it is hanging over it also. Resize cactus to 25% and place one behind the jacket and barrel on the right and then duplicate mirror and place behind the barrels on the left...remember to add your drop shadows as you go along. Add your tube and place above the barrels on the left and add your drop shadow.  Resize your lasso rope and place on bottom layer and mirror and place just at your tubes feet....duplicate flip and mirror. You might decide to add more elements, let your creativity flow....
Word art I used I resize to 15%, then added baked earth xenofex1.0, this is optional. Added a gradient glow, medium with color #732f0e, add your name and do the same as you did with the wordart...Now close off your white background if you had one and merge visible....resize....I resize to 80% and then sharpen...now add your copyright info.
That's it, hope you enjoyed doing my tut
Hugs SharonC

Tuesday, October 18, 2011

Gothic Dreams FTU

gothic dreams

This tut was written on Oct 18th, 2011
This tut was written for those with a basic knowledge of psp.
I am using the awesome artwork of  Jose Cano. You need a license to use his work. Please do not use without a license.  
He use to sell at PTE when I bought my tube, which has closed now.
You can find his art at his store  HERE
 
Scrap kits used is a FTU called Gothic Dreams by Lacarolita and  you can get it  HERE

Supplies Needed
PSP...I used PSPX...but any of them should work.
Filters used
Xero-Porcelain, Radiance and Mistifier
Drop shadow is usually 2V 2H 40 5 unless otherwise stated
Font Dark II HERE
Mask DBV111  HERE

Ok Let's start
Open a 700 x 700 image, you can resize later, I like room to work...lol. Fill with white so you can see what you are working on better.
Open paper 8 and resize to 85% and apply mask 111, delete, merge group. Add paper 6, resize to 80% and apply the same mask again, delete and merge group, lower the opacity on this one to about 46 or so.
Open Frame 2 and resize 50%. Take your magic wand and click inside, go to selections, expand and expand by 3, paste paper 3, invert delete. Do not deselect yet. Move paper below the frame, copy your close up and position and then hit the delete on your keyboard, select none. Duplicate your close up, go to Adjust, blur, gaussian blur at 4, change blend mode to hard light, add the xero filter-Porcelain on the copy, go to the orginial and add xero filter-Radiance, then back to copy and merge down. Apply xero filter-mistifier now. Add your drop shadow of V-3 H4 40 5. Add drop shadow to frame also.
Copy and paste your tube on top of frame, resize if needed. I resized mine a bit to 95%. Move below the frame, erase any parts you do not want to show underneath the frame, then duplicate and bring to the top and erase the parts on the frame that you do not want. Refer to my tag. Add drop shadow on the orginial tube, but change the H to -3 this time.  Resize ribbon 2 and place on frame, add drop shadow, duplicate, flip and mirror.  Resize the skull to 15%, add drop shadow and place on bow, free rotate to the left 20%, duplicate and mirror and place on the other bow.
Resize boot 1 35%, place to the left of the frame, duplicate, mirror and move back to the other boot and move it down just a bit.  Resize corset 1 to 60% and free rotate to the left by 15% and place by the boots, add drop shadow.  Resize the sad teddy to 20% and place by the corset, add drop shadow.
Resize wingedskull 2 to 20% and place at the top, duplicate, resize 75% and move to the right and position where you like, and duplicate one more time if you like and place over by the corset strap.  Resize the zipped lips 40% twice and free rotate to the right 20% and place on the frame on the right.
Close off your white background and merge visible. Copy and paste as a new image and resize either 80% or 85%, depending on how large you like your tags. Adjust and sharpen, once you resize.
Add your Copyright and name and you are done.
I hope you have enjoyed doing my tut.
Hugs SharonC